Wednesday, December 19, 2012

How to share data between two diff web apps


How to share data between web-apps

way 1) Sharing data using cookies
===================

Code on WebApp1 Login Servlet
-------------------------------------------
 below code will be execute once you click on any link or button , and it will call the login servlet  
 of webApp2 and webApp2 will read the data from the cookies

userData.put("password", radiusLoginForm.getPassword());
Cookie cookie1 = new Cookie("username","admin");
cookie1.setPath("/");
Cookie cookie2 = new Cookie("password","admin");
cookie2.setPath("/");

response.addCookie(cookie1);
response.addCookie(cookie2);


code on webapp2 Login Servlet to obtain data from the cookies
-----------------------------------------------------------------------------------
        String username= "";
        String password= "";

        Cookie cookies[] = request.getCookies();
for(Cookie cookieObj : cookies){
if(cookieObj.getName().equalsIgnoreCase("username")){
username = cookieObj.getValue();
}else if(cookieObj.getName().equalsIgnoreCase("password")){
password = cookieObj.getValue();
}
}


way 2) Sharing data using ServletContext
===============================

Note : Lets assume that we are accessing webApp2 from webApp1

First open and edit the tomcat "server.xml"

Find the tag into server.xml and add the crossContext="true" attribute into both the   
        context tag

Ex:


Then add the context param into the web.xml of  webApp2
Ex:

  SharedSessiondataContext
  /webApp1

Code into the webApp1 Login servlet (this servlet you will call from the webApp1 servlet)
-----------------------------------------------------------------------------------------
below code will obtained you the data which you have shared using the webApp1 servlet context

  HashMap userData = new HashMap();
  userData.put("username", "admin");
  userData.put("password", "admin");
storeDataInContext(getServlet().getServletContext(), sessionId, userData);

public synchronized static void storeDataInContext(ServletContext context, String sessionid, HashMap
String> userData)
{
    Hashtable> shareddata = new Hashtable>();
    shareddata.put(sessionid, userData);
    context.setAttribute("sharedUserData", shareddata);
}


Code into webApp2 Login Servlet
-------------------------------------
HashMap userData = getUserRolesFromContext(getServletConfig().getServletContext(),ssoSessionid);

public static HashMap getUserRolesFromContext(ServletContext context, String ssosessionid) {
   String SignonContext = context.getInitParameter("SharedSessiondataContext");
   HashMap userData = null;
   if(SignonContext!=null){
   ServletContext ssocontext = context.getContext(SignonContext);
   if(ssocontext!=null){
   Hashtable> shareddata = ((Hashtable
HashMap>)ssocontext.getAttribute("sharedUserData"));
   if (shareddata!=null) {
       Logger.logInfo(MODULE,"SSOSESSIONID : "+ssosessionid);
       userData =(HashMap)shareddata.get(ssosessionid);        
   }
   }
   }
   return userData;
}


way 3) Sharing Data using URL parameters
=========================================

This code is for basic sso implementation using URL parameters

WebApp1 
-------------
Lets assume that you are logged-in in your WebApp1 and
calling below URL of WebApp2 using any menu-link in WebApp1 jsp page

i.e : http://localhost:8080/WebApp2/LoginServlet?sessionId=<%=request.getSession().getId()%>

once you will clicked upon this url your WebApp2's LoginServlet will get called and below code will be
        execute in your LoginServlet of WebApp2

code in LoginServlet of WebApp2:
================================
String sessionIdParam = request.getParameter("sessionId");
String userIdParam = request.getParameter("userId");

if(sessionIdParam!=null && userIdParam==null){
           counter = 0;
           tempSessionId = sessionIdParam;
           String ssoUrl = getSSOUrl(); // this method will
           if(ssoUrl!=null){
            Logger.logInfo(MODULE, "Forwarding to "+ssoUrl);
response.sendRedirect("http://localhost:8080/WebApp1/LoginServlet?                      

        sessionId="+sessionIdParam);
// from here LoginServlet of WebApp1 will be called and we will send back the same sessionId
           }else{
            System.out.println("Invalid URL");
           }
           return;
}else{
           counter++;
}

if(sessionIdParam!=null && userIdParam!=null){
        if(tempSessionId.equals(sessionIdParam) && counter==1){
// you are done with the user verification you can do here further code now
            }
}

code in LoginServlet of WebApp1:
================================

String sessionId = (String)request.getParameter("sessionId");
// userId/username you need to set in session after logged into the WebApp1, so you will get it from session
as given below
String userId = (String)request.getSession().getAttribute("userId");  
String currentSessionId = request.getSession().getId();

if(sessionId!=null && userId!=null){
           if(currentSessionId.equals(sessionId)){
response.sendRedirect("http://localhost:8081/WebApp2/LoginServlet?userId="+userId

+"&sessionId="+sessionId);
            }
           }
}

Read Me:
--------
In Above code we are verifying the sessionid with the sessionid we have received from the WebApp2's
response.sendRedirect() url and after verifying the url we are sending back the same sessionId , and this time
we are sending the userId also, so now we will have sessionId and userId in the WebApp2, so we will verify this sessionId again on the WebApp2 and check whether we have received the userId or not, and if the sessionId is not null and userId is not null then we will verify the sessionId with the tempSessionId and then its done...


Thursday, December 13, 2012

Sharing data between different java web apps on same server, using context

Visit below Link for the complete help

source : http://www.fwd.at/tomcat/sharing-session-data-howto.html

Thursday, December 6, 2012

JAVA SCRIPT to get url parameters

function getUrlParameteres() {
   var vars = {};
   var parts = window.location.href.replace(/[?&]+([^=&]+)=([^&]*)/gi, function(m,key,value) {
        vars[key] = value;
   });
return vars;
}
function autoLogin(){
    var username = getUrlParameteres()["username"];
   var password = getUrlParameteres()["password"];
   if(username!=null && password !=null && username!=’undefined’ &&       password!=’undefinied’){
             document.systemLoginForm.userName.value=username;
             document.systemLoginForm.password.value=password; 
             document.systemLoginForm.submit();
    }
}

Tuesday, November 20, 2012

JAVA SCRIPT TO VALIDATE TIME IN "dd-mm-yyyy hh:mm:ss" FORMAT


function validateStartTime() {
//This function will validte the datetimes of this format : dd-mm-yyyy hh:mm:ss
var date = document.getElementById("startTime").value.trim();
    var valid = true;
    var spaceIndex = date.indexOf(" ");
    var onlyDate = date.substring(0,spaceIndex);
    var dateData = onlyDate.split("-");
    var onlyTime = date.substring(spaceIndex);
    var timeData = onlyTime.split(":");
    var day = (dateData[0]);    
    var month = (dateData[1]);   
    var year   = (dateData[2]);   
    var hour   = (timeData[0]);   
    var min = (timeData[1]);   
    var sec = (timeData[2]);     
    var regForDate = new RegExp("\\d{1,2}-\\d{1,2}-\\d{4}$");
    var regForTime = new RegExp("\\d{1,2}:\\d{1,2}:\\d{1,2}$");
 
    if(!regForDate.test(onlyDate)) valid =false;
    else if(!regForTime.test(onlyTime)) valid =false;
    else if((month < 1) || (month > 12)) valid = false;
    else if((day < 1) || (day > 31)) valid = false;
    else if(((month == 4) || (month == 6) || (month == 9) || (month == 11)) && (day > 30)) valid = false;
    else if((month == 2) && (((year % 400) == 0) || ((year % 4) == 0)) && ((year % 100) != 0) && (day > 29)) valid = false;
    else if((month == 2) && ((year % 100) == 0) && (day > 29)) valid = false;
    else if((hour < 0) || (hour > 24)) valid = false;
    else if((min < 0) || (min > 59)) valid = false;
    else if((sec < 0) || (sec > 59)) valid = false;      

return valid;
}

Servlet’s class files are not getting generated by ECLIPSE


Go to project properties > Java Compiler 

Then change the “compiler compliance level” of JDK to the one which is not installed in your PC

Uncheck the “Use Default Compliance settings” 

Set the “Generated .class files compatibility” same as “compiler compliance level” 

 Set the “Source Compatibility” same as “compiler compliance level” 

 Then click on “Apply” button and click on “Ok” button 

 Then build your project even if you are getting error. 

 Now again follow the same steps with the “compiler compliance level” of JDK which is installed in your PC  

 Now build your project It will generate the class files now. 

Monday, August 13, 2012

JOptionPane - showInputDialog


import javax.swing.*;


class AdditionDemo{
public static void main(String rk[]){


try{
String num1 = JOptionPane.showInputDialog("Input fist Value") ;
String num2 = JOptionPane.showInputDialog("Input second Value") ;

int a = Integer.parseInt(num1);
int b = Integer.parseInt(num2);
int c = a+b;
JOptionPane.showMessageDialog(null," Total is : "+c);

}catch(Exception e ){
JOptionPane.showMessageDialog(null,"Oop !! Buddy, you gave wrong input. :-( ");
}
}
}

REGEX for number greater than zero

var nre= /^[1-9]+[0-9]*$/;
var regexp = new RegExp(nre);

if(regexp.test(val)){
alert(“Number is greater than zero.”)
}

STRUTS : logic:notEmpty

"<"logic:notEmpty name=”beanName” property=”beanPropertyName”">"

"<"bean:write name=”beanName” property=”beanPropertyName”/">"

"<"/logic:notEmpty">"


Note : if you have DataBean.java class with userName as its one property variable, and if you gave one object of DataBean class i.e “dataBean” in request scope , then you could use that object as given below into the destination .jsp page.


"<"logic:notEmpty name=”dataBean” property=”userName”">"

"<"bean:write name=”dataBean” property=”userName”/">"

"<"/logic:notEmpty">"

STRUTS – ITERATE MAP – logic:iterate

"<"logic:iterate id=”keyValuePair” name=”mapName”">"

"<"bean:write name=”keyValuePair” property=”key”/">"
"<"bean:write name=”keyValuePair” property=”value”/">"

"<"/logic:iterate">"

STRUTS- ITERATE LIST : logic:iterate

"<"logic:iterate id=”userName” name=”userNameList”">"

"<"bean:write name=”userName”/">"

"<"/logic:iterate">"

STRUTS- ITERATE LIST TO GET OBJECT : logic:iterate

"<"logic:iterate id=”studDataObj” name=”dataList” type=”com.student.Data” ">"

"<"bean:write name=”studDataObj” property=”rollNumber”/">"
"<"bean:write name=”studDataObj” property=”name”/">"

"<"/logic:iterate">"


Note : Here com.student.Data is the package name with actualy “Data.java” class

class Data {

String name;

int rollNumber;

/*

……………

setter getter method

…………….

*/

}

STRUTS : logic:equal , logic:notEqual

logic:equal

"<"logic:equal name=”studentDataObject” property=”rollNumber” value=”11″">"
"<"bean:write name=”studentDataObject” property=”rollNumber”/">"
"<"/logic:equal">"

——————————————————————————————————-

logic:notEqual

"<"logic:notEqual name=”studentDataObject” property=”rollNumber” value=”3″">"

"<"bean:write name=”studentDataObject” property=”rollNumber”/">"

"<"/logic:notEqual">"

JQUERY : GET SELECT-OPTION VALUE

$(document).ready(function() {   

    $('#selectElementId').change(function(){

                var value=$('#selectElementId').val();
                alert(value)

    });

});

Friday, December 23, 2011

VARIOUS WAYS TO ITERATE MAP OR HASHMAP IN JAVA

How to Iterate MAP or HASHMAP in JAVA

Map<Integer, Integer> map = new HashMap<Integer, Integer>();

for (Map.Entry<Integer, Integer> entry : map.entrySet()) {
    System.out.println("Key = " + entry.getKey() + ", Value = " + entry.getValue());
}


Map<Integer, Integer> map = new HashMap<Integer, Integer>();

//iterating over keys only
for (Integer key : map.keySet()) {
    System.out.println("Key = " + key);
}
//iterating over values only
for (Integer value : map.values()) {
    System.out.println("Value = " + value);
}Map<Integer, Integer> map = new HashMap<Integer, Integer>();

Iterator<Map.Entry<Integer, Integer>> entries = map.entrySet().iterator();
while (entries.hasNext()) {
    Map.Entry<Integer, Integer> entry = entries.next();
    System.out.println("Key = " + entry.getKey() + ", Value = " + entry.getValue());
}


Map map = new HashMap();

Iterator entries = map.entrySet().iterator();

while (entries.hasNext()) {
    Map.Entry entry = (Map.Entry) entries.next();
    Integer key = (Integer)entry.getKey();
    Integer value = (Integer)entry.getValue();
    System.out.println("Key = " + key + ", Value = " + value);
}


Map<Integer, Integer> map = new HashMap<Integer, Integer>();

for (Integer key : map.keySet()) {
    Integer value = map.get(key);
    System.out.println("Key = " + key + ", Value = " + value);
}

Monday, December 19, 2011

(AVD) Android Emulator not loading on netbeans


Step 1 ) Open your AVD manager


Step 2 ) Click on new button on the right hand side top corner


Step 3 ) Now follow the Images given here


Step 4) Now restart yous Netbeans and Run your android application.


Step 5 ) Thank You.


Wednesday, December 7, 2011

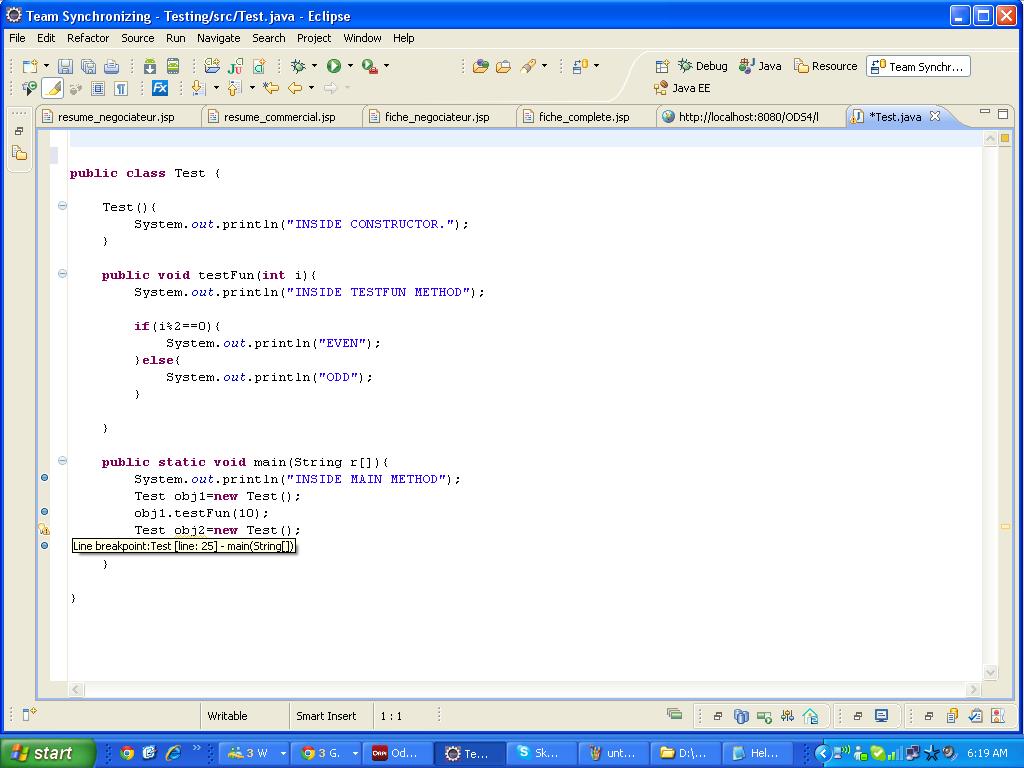
HOW TO DEBUG JAVA CODE IN ECLIPSE

 1. Introduction
Debugging allows you to run the program interactively and to watch the source code and the variables during this execution.
A Java program can be started in "Debug mode". You can set breakpoints in your Java code in which the execution of the Java code will stop if the Java program is executed in "Debug mode".

2 .Set Breakpoints

To set breakpoints right click in the small left column in your source code editor and select "Toggle Breakpoint". Or you can double click on this position.


3. Star Debugger

You can debug your application, select a Java file which contains a main method, right click it and select Run →Debug.


If you have not defined any breakpoints, this will run your program as normal. To debug the program you need to define breakpoints.
If you start the debugger the first time, Eclipse ask you if you want to switch to the debug perspective. Answer "yes". You should then see a perspective similar to the following.


You can use F5 / F6, F7 and F8 to step through your coding. The meaning of these keys are explained in the following table.

CommandDescription
F5Goes to the next step in your program. If the next step is a method / function this command will jump into the associated code.
F6F6 will step over the call, e.g. it will call a method / function without entering the associated code.
F7F7 will go to the caller of the method/ function. So this will leave the current code and go to the calling code.
F8Use F8 to go to the next breakpoint. If no further breakpoint is encountered then the program will normally run.


Thank You.


Tuesday, November 29, 2011

NETBEANS SHORTCUTS (Debugging)


Debugging
Ctrl-F5                        Start debugging main project

Ctrl-Shift-F5              Start debugging current file

Ctrl-Shift-F6              Start debugging test for file
(JUnit)
Shift-F5/F5                Stop/Continue debugging session

F4                               Run to cursor location in file

F7/F8                          Step into/over

Ctrl-F7                        Step out

Ctrl-Alt-Up                 Go to called method

Ctrl-Alt-Down            Go to calling method

Ctrl-F9                        Evaluate expression

Ctrl-F8                        Toggle breakpoint

Ctrl-Shift-F8              New breakpoint

Ctrl-Shift-F7              New watch

Enhanced by Zemanta

NETBEANS SHORTCUTS (JSP Editor Code Templates)


JSP Editor Code Templates
ag                    application.getAttribute("|")

ap                    application.putAttribute("|",)

ar                     application.removeAttribute("|")

cfgi                  config.getInitParameter("|")

jspf                 

jspg                 

jspi                  

jspp                 

jsps                 

jspu                 

oup                  out.print("|")

oupl                 out.println("|")


pcg                  pageContext.getAttribute("|")

pcgn                pageContext.getAttributeNamesInScope("|")

pcgs                pageContext.getAttributesScope("|")

pcr                   pageContext.removeAttribute("|")

pcs                  pageContext.setAttribute("|",)

pg                    <%@page |%>

pga                  <%@page autoFlush="false"%>

pgb                  <%@page buffer="|kb"%>

pgc                  <%@page contentType="|"%>

pgerr                <%@page errorPage="|"%>

pgex                <%@page extends="|"%>

pgie                 <%@page isErrorPage="true"%>

pgim                <%@page import="|"%>

pgin                 <%@page info="|"%>

pgit                  <%@page isThreadSafe="false"%>

pgl                   <%@page language="java"%>

pgs                  <%@page session="false"%>

rg                     request.getParameter("|")

sg                    session.getAttribute("|")

sp                    session.setAttribute("|", )

sr                     session.removeAttribute("|")

tglb                  <%@taglib uri="|"%>

Enhanced by Zemanta

NETBEANS SHORTCUTS (Coding in Java)


Coding in Java

Alt-Insert                    Generate code

Ctrl-Shift-I                  Fix all class imports

Alt-Shift-I                   Fix selected class's import

Alt-Shift-F                  Format selection

Alt-Shift Left/             Shift lines left/right/up/down
Right/Up/Down

Ctrl-Shift-Up/D          Copy lines up/down

Ctrl/Alt-F12                Inspect members/hierarchy

Ctrl-/                            Add/remove comment lines

Ctrl-E                          Delete current line


Ctrl-K/Ctrl-Shift K     Next/previous word match

Alt-Left/Alt-                Go backward/forward/to last

Right/Ctrl-Q               edit

Alt Up/Down              Next/previous marked occurrence

NETBEANS SHORTCUTS (Navigating through Source Code)


Navigating through Source Code

Ctrl-O/Alt-Shift-O       Go to type/file

Ctrl-Shift-T                  Go to JUnit test

Alt-O                           Go to source

Ctrl-B                          Go to declaration

Ctrl-G                          Go to line

Ctrl-Shift-M                 Toggle add/remove bookmark

Ctrl-Shift-Period/Comma    Next/previous bookmark

Ctrl-Period/Comma    Next/previous usage/compileerror

Ctrl-Shift-1/2/3           Select in Projects/Files/Favorites

Ctrl-[                          Move caret to matching bracket

Ctrl-K/Ctrl-Shift K     Next/previous word match

Alt-Left/Alt-                Go backward/forward/to last

Right/Ctrl-Q               edit

Alt Up/Down             Next/previous marked occurrence